When Lindsay from Makely School for Girls invited me to participate in her blog hop, Knocktoberfest, I instantly said yes!! It’s a blog hop between 29 amazing bloggers featuring budget friendly, knock off projects inspired by high end items! There have been some AMAZING projects, make sure to check them all out here!
If you’re coming over from Laura – Finding Home, welcome! If not, make sure to pop over and check out her fabulous project LOVE it!!
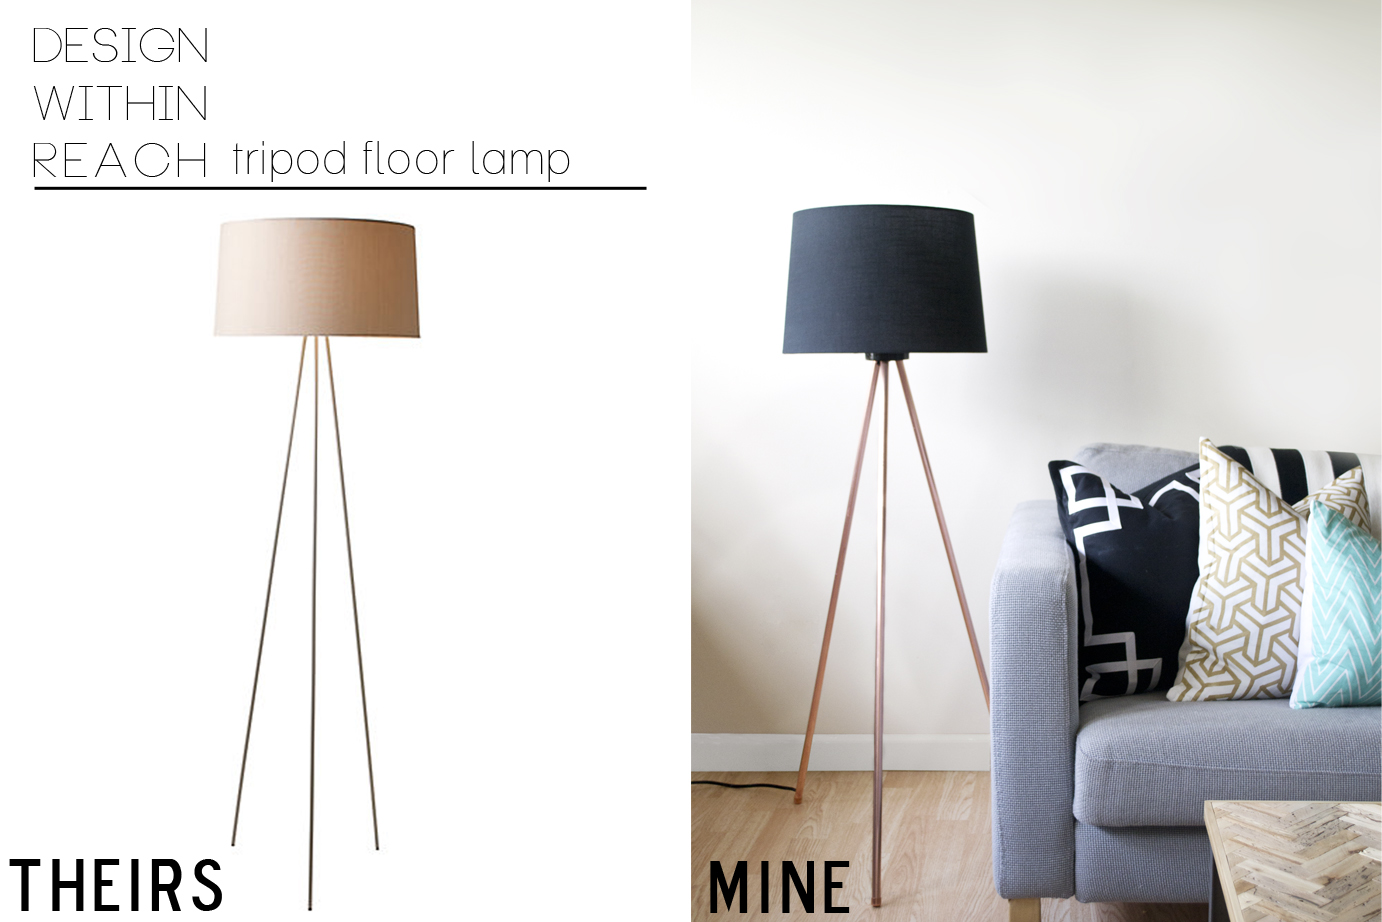
We recently moved and are getting settled, but we managed to find a few tools and pull together a fun lamp inspired by Design Within Reach’s Tripod Floor Lamp.
We haven’t unpacked all of our tools yet, but we found just enough to make a lamp.
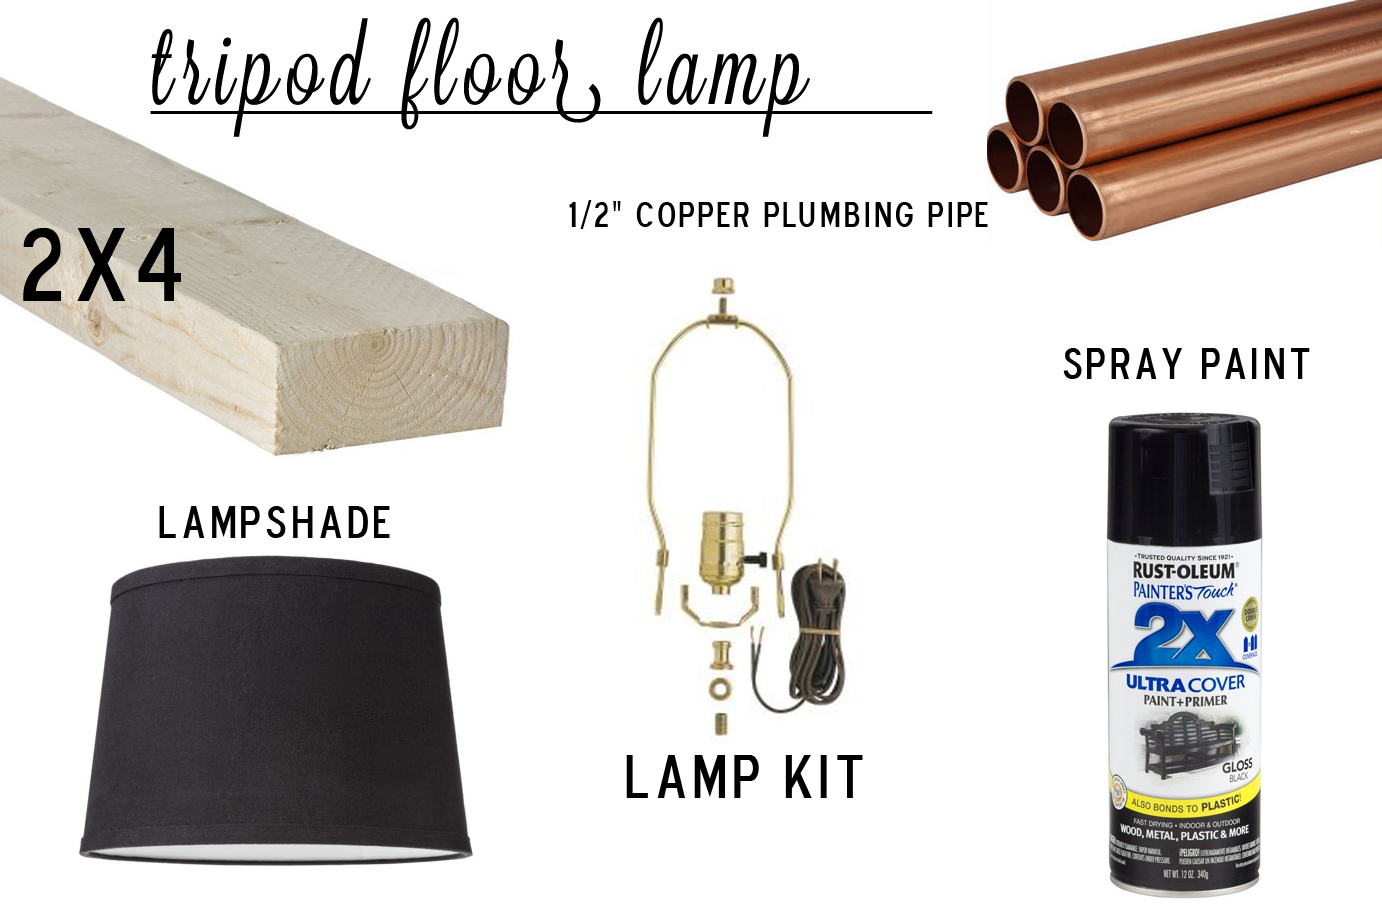
2×4 – cut to a circle and holes were drilled to hold the legs / 1/2″ copper plumbing pipe – 1 10′ piece cut into three even sections / we didn’t need everything in a lamp kit so we sourced our items separately – a nut, wire with plug, socket, and a threaded nipple. / black spray paint to paint the 2×4 and the wire / lampshade
I missed a few photos, but I’ll try to explain along the way, feel free to ask if I miss anything 
Here’s how we did it!
We created a template to mark where the holes would be drilled and then held a template to mark the angle of the drill (removed once we started drilling). Since this wasn’t precise, we had to go through three variations until we had one that was even. Not the best way to go about it, but worked with our limited tools
Click HERE to download a template of our hole placement and the template for the angle (we cut the pieces out and taped the hole placement to the wood and held the angle up prior to drilling and then removed once we started drilling.) There are multiple copies on the page in case you need extra, they are all the same. Print on 8.5×11 paper.
** the pipe measures 1/2″ INSIDE, 5/8″ on the outside – yep forgot to measure – we had to make a trip back to get the 5/8″ bit since we needed it to be precise.

We cut a notch in the middle for the socket to sit in.
Next, using a cup, we marked a circle around our holes, cut it out with a jigsaw, and sanded down it down with an electric sander.

We drilled holes in one of the copper legs for the wire to fit in. Next, we threaded the wire through one of the legs and wired the socket.

I then taped the legs and socket and painted the mounting piece (would’ve been easier before assembling

While the paint dried, I polished the copper legs. I liked the color as is, but wanted to remove the red text. I rubbed it with ketchup and let it sit for about 30 minutes (note, make sure that it is out of reach of pets, kids, etc. – annabelle, our puppy, got a taste) I then used a combo of cleaner (to remove the ketchup residue some of the text came off too) and then nail polish remover to erase the red print.

We reassembled and then turned it on – it worked!


The cord runs through a leg and out a hole drilled on the bottom. We also used copper end caps to finish off the leg.


This is actually our first floor lamp – I love the height that it adds!

After getting the supplies, we finished the lamp in one evening and spent about $34.50.
Cost breakdown:
1 – 10′ copper pipe cut in three even sections – $10 (Home Depot)
3- Copper end caps, .50 each – $1.50 (Home Depot)
Wire – $2 (Home Depot)
Additional lamp parts – $3 (Home Depot)
Lamp shade $ 18 (Target)
2×4 section (Scrap pile at Home Depot)
$16.50 for base + lamp shade $18 = $34.50, sure beats the nearly $400 price tag at DWR!

I’m up last for the tour – so make sure to head back to Lindsay’s Makely School for Girls to catch any of the projects that you might have missed!!
or catch up here!
|
Monday, October 21
1. Lindsay – Makely School for Girls
|
|
2. Beth – Home Stories A to Z
|
|
3. Gina – Shabby Creek Cottage
|
|
4. Beckie – Infarrantly Creative
|
|
5. Emily – Decorchick!
|
|
6. Wendy – The Shabby Nest
|
|
Tuesday, October 22
1. Donna – Funky Junk Interiors
|
|
2. Jess and Monica – East Coast Creative
|
|
3. Jackie – Teal and Lime
|
|
4. Jen – Tatertots and Jello
|
|
5. Carmel – Our Fifth House
|
|
Wednesday, October 23
1. Chris – Just a Girl
|
|
2. Lindsay – The White Buffalo Styling Company
|
|
3. Melissa – The Inspired Room
|
|
4. Ana – Ana White
|
|
5. Marianne – Songbird
|
|
6. Karianne – Thistlewood Farms
|
|
Thursday, October 24
1. Roeshel – DIY Showoff
|
|
2. Sandra – Sawdust Girl
|
|
3. Jamie – C.R.A.F.T.
|
|
4. Cassity – Remodelaholic
|
|
5. Melissa – 320 Sycamore
6. Mandi – Vintage Revivals
|
|
Friday, October 25
1. Ashley – The Handmade Home
|
|
2. Stacy – Not JUST a Housewife
|
|
3. Traci – Beneath My Heart
|
|
4. Brooke – All Things Thrifty
|
|
5. Laura – Finding Home
|
|
6. Sarah – Sarah M Dorsey Designs
|
An incredible knockoff perfectly executed! Well done. For the mounting piece, how did you figure the angle that you needed the legs to come in at?
This is perfect, Sarah! I love DWR – I might have to try to make this myself!
gorgeous! how do you have time for all of this with the move- you amaze me!
Super awesome Sarah Have a great weekend! xo Kristin
Brilliant!! I am new here and loving your blog
This is crazy good, Sarah! And who knew that about ketchup and nail polish remover??? That's awesome. Amazing job!
So pretty! I totally expected you to blow me away with your project again and you did
I have a feeling you will be adding more darker hints here and there in your new place, aren't you?
I love the way you shined up the copper! It looks so much better.
I'm also happy to see the bit of the driftwood table meaning that the movers must have done a better job
Thank you!! Yes! The movers did a much better job this time, just minor damage and the driftwood table made it here perfectly
Awesome job Sarah! You're the queen of knock off!
MIND BLOWN.
I love this project! It turned out looking so great. Love your style, by the way.
Not surprisingly, this lamp is a stunner! The copper legs are genius and looks lovely.
Look at you, all making lamps and stuff! Awesome. And ketchup?! I read that part twice, sure I had misunderstood
I like your lamp 100 times better, and the ketchup trick?!? Awesome! The color is much better post-ketchup!
Holy cow this is amazing- I love it!! Hmmmm, now I need to find a spot for another floor lamp because I totally want to make this!
Love how it turned out, the lamp shade color is gorgeous!
Wow! Your lamp is so much more within reach Love the tip about polishing the copper!
ooh, I love it! and floor lamps can be SO expensive….it's a great thing to DIY!
Love it! I love most things made of copper. Whenever I've made curtain rods out of copper pipe I use steel wool to remove the coating and letters from copper. Then I spray with clear spray paint to seal it so it doesn't patina.
You two make quite the DIY pair! That looks amazing!
amazing. you are always so creative, and have such great out-of-the-box thinking. and, you always make it seem so do-able!
that is awesome! These tripod lamps can be expensive. I scored one when Mitchell Gold store was going out of biz here and it my fav lamp ever!! I love the copper! Great DIY idea
laura
Wow! Great job! Unbelievable savings! Love it, Sarah!
A-MA-ZING! Maybe I'll try this.
You are genius! I will do it for sure! Thanks!
I'm a real fan of your blog!
Really love this lamp, I might have to try it myself!!
Oh wow, this is cool! I adore your trick on cleaning the copper too! The lamp (and your photos) are truly stunning!
I am so making this!! What an awesome knock off. All of the knock offs in this series have been so awesome. Seriously love it.
A friend just forwarded this to me because I've been working on making a tripod table with copper pipe legs but I can't figure out the angle! You make it look so easy! What angle did you use?
So smart!! I love it!!
You are amazing! I like your version even better than the inspiration, the copper makes it stand out!
This is amazing! I want one!
You always impress me!!
XX jana
Thank you! Thank you! Thank you! :*
Thank you so much for publishing this tutorial! You guys are geniuses! his is a great, easy-to-do project that requires only basic tools, and anyone crafty/handy can do. Excellent instructions; thanks in particular for including the things that didn't quite go right the first time — sometimes that's the most helpful information!
Your solution is very clever and simple — I'm very excited thinking about all the design options that could be made just by adapting your basic template and instructions for other materials. For example, a large diameter steel pipe would be a great industrial look (I would probably tighten up the leg angles with larger pipe for the legs). And stair railing balusters come in lots of designs and varying heights, in both wood and metal; these could be easily adapted for a unique look that fits your own style and decor. Three balusters might cost a bit more (say up to $30 for three, instead of $10 for one piece of copper pipe).
A steel pipe version is definitely going on my project list; thanks so much for sharing your knowledge and experience!
Really like this project what a cool idea. I've been using copper piping myself in projects and have just made a magazine rack but was wondering what else I could make with the piping. Thanks for the inspiration.
Very well done! I love the finishing touches like the cord running through the pipe and the copper caps at the bottom. Bravo!
How has the power cord held up? It is running through two holes in one copper pipe leg, and I did not see any rubber grommets to protect the cord from abrasion and eventual electrifying of the lamp.
Sarah, how is the copper holding up a couple years later? Has it tarnished? Have you polished it? Planning a DIY project with copper piping but the tarnished look won't quite work so curious to know if you've kept it shiny!
Hi Hannah – I actually don't have the light out – it's in storage right now – so I'm not sure. But I would guess if you sealed it with a clear poly, it wouldn't need to be re polished
Hi Sarah!! I love this tutorial! You did such a good job and that lamp looks fabulous! I wanted to shout out you and this tutorial as I am using the way you polished it in my blog. Please let me know if that is ok! And I might have to try this lamp out
Just found your site, and I love this lamp you made. I've been wanting two of these, but like you, found them to pricey. Thanks to you, hopefully my hubby and I will be able to make them.
a few people already asked this but the question hasn't been answered yet: what degree/angle did you drill the holes for the legs at?
Hi Aaron! Thanks for your comment! Unfortunately, I don’t remember the angle. Sorry to not be of more help.
I just used watered down vinegar and a paper towel