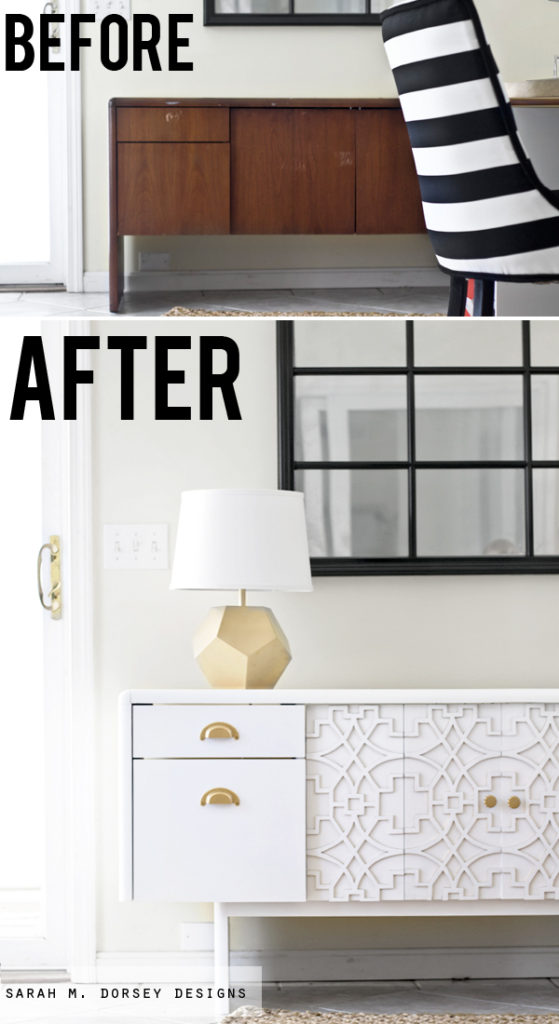
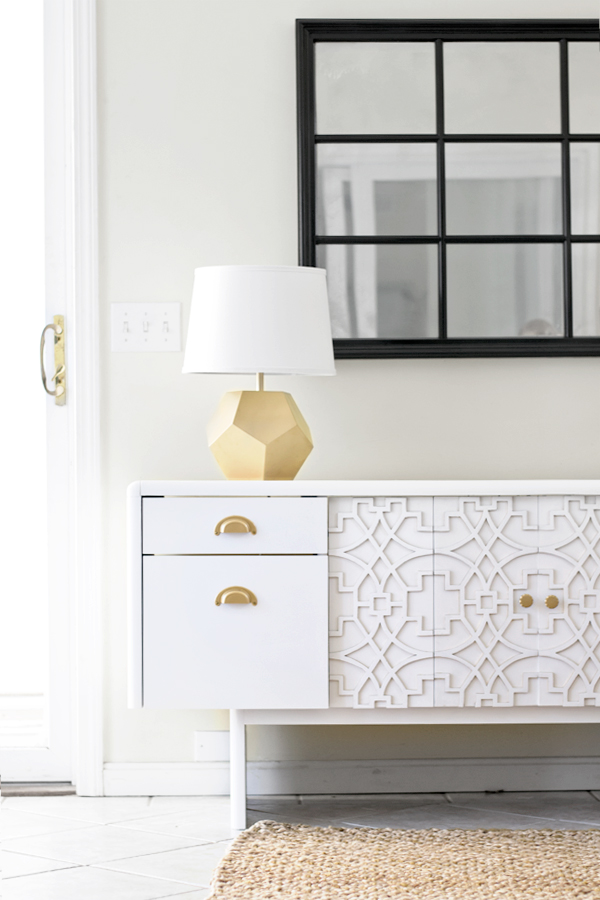
Today I’m finally sharing our credenza transformation! Of course the highlight, is the amazing overlays that I showed you last week. They did take a while to cut, but in the end it was SO worth it. I love the extra detail that it adds!!
—
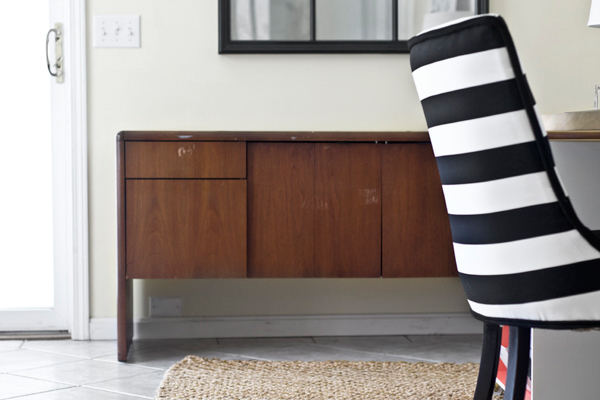
The other week, David and I were thrifting and he found this commercial office credenza. We were planning on building one, but it’s a lot of wood, which makes it pretty expensive, plus our last credenza took forever to build and paint (lots of different surfaces!) So while I wasn’t thrilled about the commercial look, I decided to give it a try. At $40, it wasn’t a huge investment.
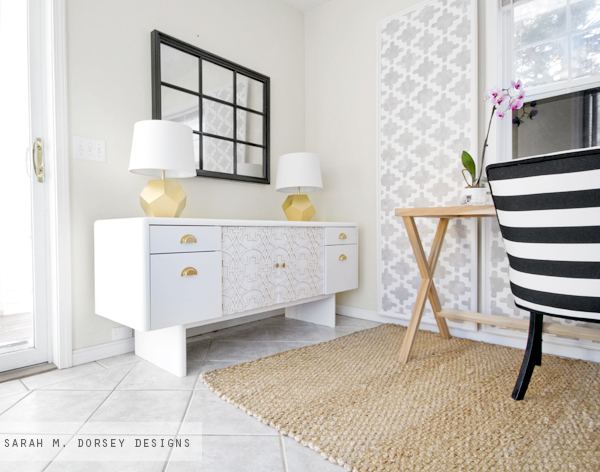
My number 1 goal was to take it from commercial to custom .. I think the overlays and subtle gold detailing does that!
When David loaded it in the truck with a Goodwill employee, he realized that it was HEAVY!! When we got home, we barely got it in the house .. it had to be dragged the rest of the way on cardboard. We were starting to regret our purchase at that time. So first things first, we had to make it lighter. The entire piece is made out of 3/4″ MDF (with veneer) or thicker. To lighten it up, we took off the back (after constructing the new base it was sturdy enough .. see below.) We may add a thin piece of plywood later, but for now, you can’t see it unless the middle doors are open. We then took off any extra hardware. Now we can move it without fear of dropping it (yes that did happen once, luckily my toes were out of the way and the tile didn’t break!)
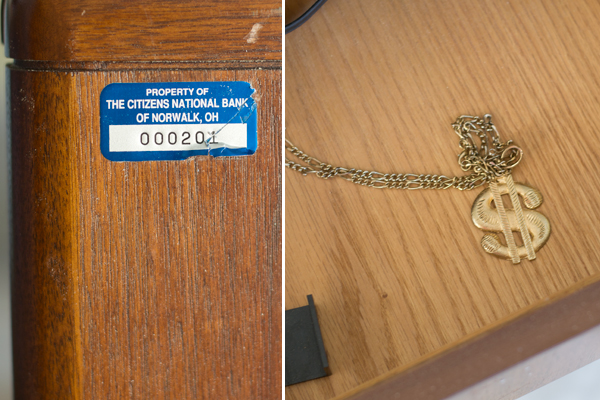
and you know how some pieces, you’re like oh I wish I knew the history .. not the case with this piece. It had a property of a bank sticker on the side and a gold money chain inside .. umm, weird. I don’t want to know where this came from.
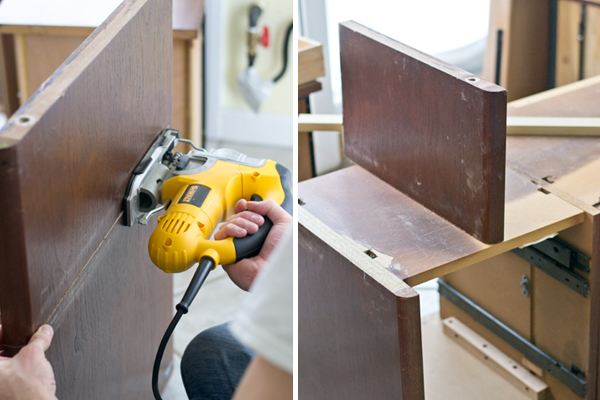
Moving on… next we reconfigured the base.
We loved the idea of chopping off the legs and insetting them to make it feel a little lighter on the bottom. So we drew a line on the side and chopped it off with a straight cut blade (it’s wider than normal) with our jigsaw. We moved it in to the center of the drawer, applied wood glue and used several long screws (through the bottom shelf) to secure it.
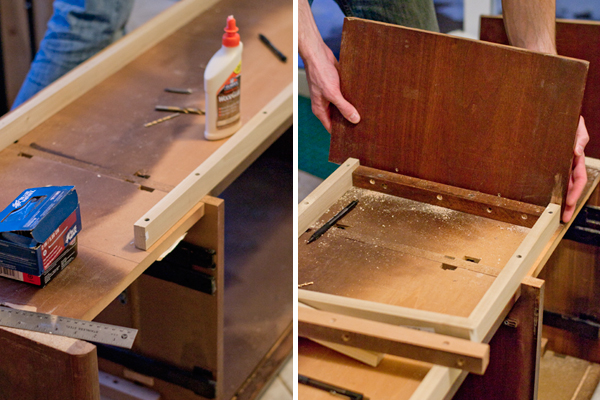
Next, we built a frame for the front out of 1×2 poplar strips and used scrap wood to brace the leg. (also, we did add an extra metal angle bracket for added support.
After that, I prepped it for paint! I cleaned it up, wiping it down with vinegar and water. Once dry, I filled the imperfections with wood filler and lightly sanded it.
Since I was painting inside (is it spring yet?) I opted for Annie Sloan Chalk paint (purchased from Perfectly Imperfect) Chalk paint is famous for the lack of prep work, but I’d recommend lightly roughing up the surface, it takes a minute, and I think the paint sticks better.
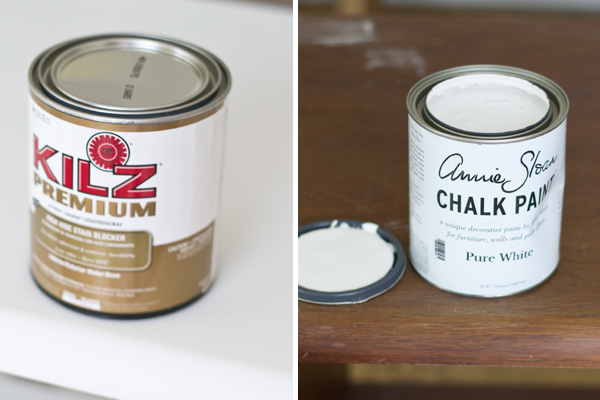
I put on one coat of Annie Sloan chalk paint and had some bleed through from the stain once dry, so I put on another (ok, maybe 3, I really didn’t want to drive back to the store) and it bled through again .. so I decided to run to the store and get a water based stain blocking primer. I tried Kilz Premium High Hide Stain Blocker – it worked great to cover the bleed through. I’m looking forward to trying it on bare wood next, to see how well it adheres! Then I put on one more coat of the chalk paint. So moral of the story, if you see your stain bleeding through, don’t apply more paint .. get a stain blocking primer!! I ended using almost the entire quart of chalk paint when I should have only used about half or less.
I decided to try rolling on the chalk paint with a smooth foam roller. It worked surprisingly well! It did leave a little texture, but with a sanding block, I lightly sanded the surface between coats, and it was so smooth!
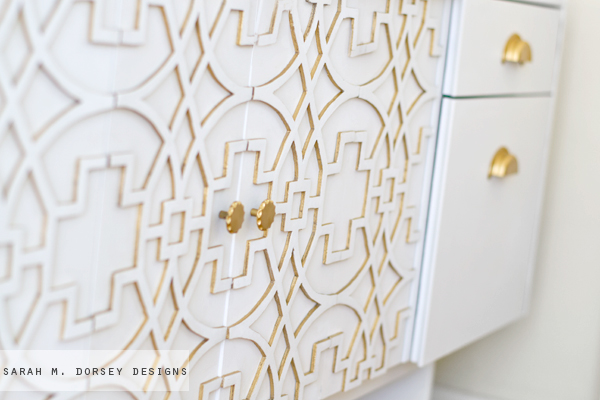
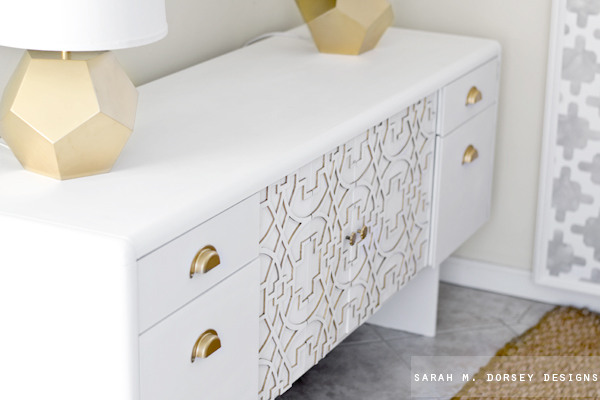
The center doors were inset from the outer doors, so we thought it was the perfect application for overlays.
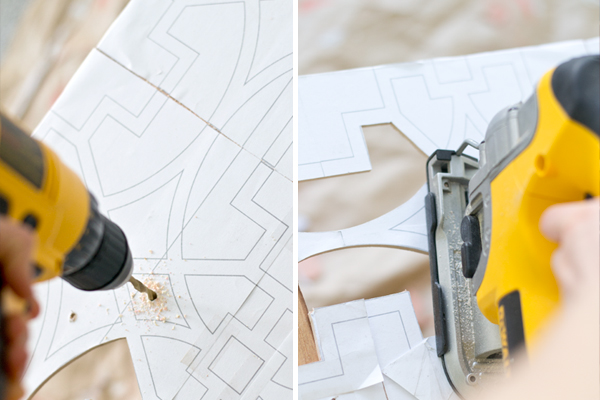
We drew the pattern in Adobe Illustrator, scaled it, and printed it on multiple 8.5×11 sheets of paper, which were then taped together. We used a little spray adhesive and attached them to a piece of 1/8″ lauan. David’s been working a lot recently .. so I tackled cutting it out myself, it was frustrating at first but after a little practice, I quickly became a pro!
First, I drilled an opening for the jigsaw blade (you want a blade that is designed to cut detail, since there are a lot of curves). I lowered the speed on the jigsaw, so that it would cut slowly. Then I cut to the middle of a line, going at an angle till I hit the line, I followed the line to the end point, pulled the saw back and then went at an angle towards the other line. To finish, I went back and cut off the little pieces that I couldn’t reach. Let me know if that doesn’t make sense ..
Tip: rotate the board as you go so that your jigsaw is resting on something to take the stress off of the thin wood – I used two drawers from the credenza, just be careful not to cut the drawers. I did break some pieces off since it’s pretty fragile, I just glued them back and used wood filler to fill the gaps.
I’m not going to lie .. it took a while, I broke it up over about 3 days. But, I think definitely worth it! I love how it came out!

For the overlays, I wanted the inside edge to be gold – for a little contrast to bring out the detail, but the top white so it would still blend with the rest of the credenza.
I tried a few different methods, but in the end I got the cleanest edges by painting the front white, and then once dry, flipping it over and painting the back and sides gold with spray paint (holding it down with my fingers as I went (learn from me – WEAR gloves). Once dry, I lightly applied wood glue and smoothed it out so it wouldn’t bleed out the edges and then weighed it down with heavy books.
I finished with clear wax, I used SC Johnson from Home Depot (in the cleaning aisle). It was only $5 and kinda stinky – it worked well, but it would be best to do outside. Make sure to apply it lightly!
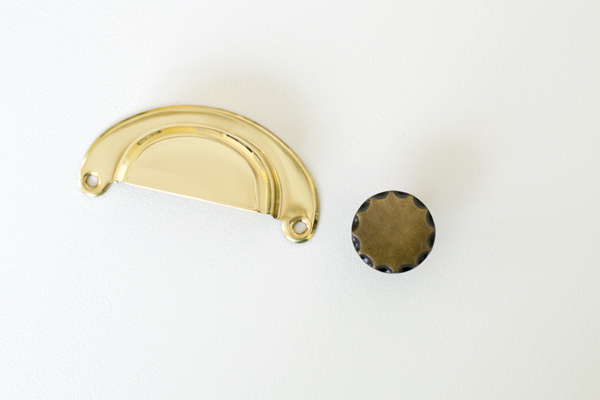
DLawless Hardware kindly provided the hardware, Hooiser Cup Pull and Colonial Antique Brass Allison Knob. Love the finishes on both, but since they didn’t match, I lightly sanded and spray painted them gold, finishing with a few thin coats of Rustoleum Triple Thick Clear Glaze for a more durable finish.

With spray paint
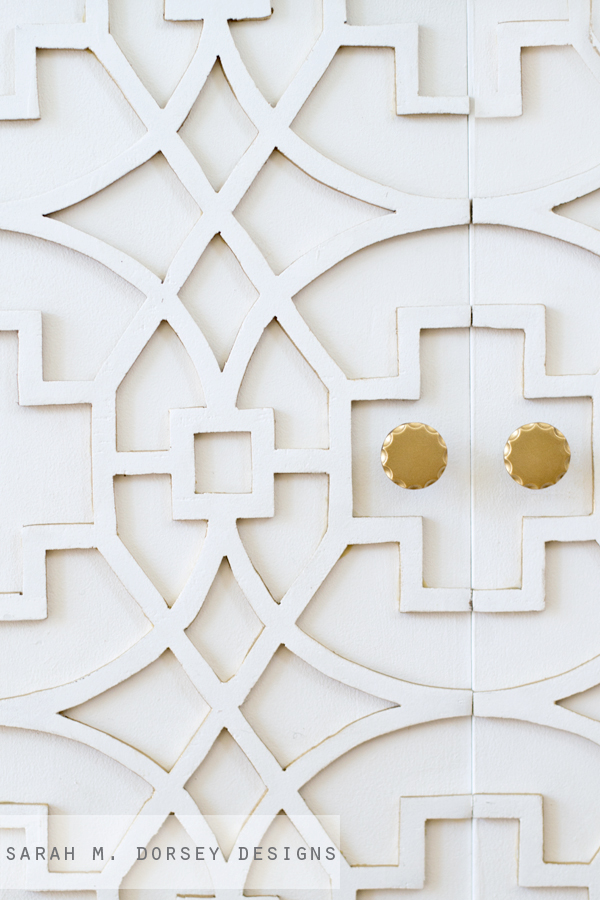
I LOVE the gold on the edges .. it really brings out the detail!
I couldn’t get a good straight on picture since my desk is in the way (we’re limited on space in Ohio .. hopefully when we move, I can get some more pics.)
I haven’t moved my printers and other office clutter over yet, since I wanted the paint to set a little more, but I can’t wait to see them neatly tucked away! (Don’t mind the small rug .. I really need a larger rug for the space)
and one last before.
and after.
Ahh MUCH better! Goodbye commercial office credenza hello custom credenza!! It’s official, I’m in love 🙂
—
and if you haven’t voted yet (or want to vote again, you can vote once an hour!) stop by Better Homes and Gardens and VOTE for me in BH&G’s Makeover Madness event!! Seriously still pinching myself that I’m included!! It just takes one click!
Vote >>> HERE
Thanks friends!
Beautiful. Love the design.
wow. that is incredible. your projects are SO fun to look at and dream. 🙂
OMG!!! We have two of those sitting down at our local thrift store right now!!! Maybe I need to show them some love!
Amber @ http://www.AverieLane.com
you amaze me, as always! love the tweaks you made, and serious commitment to the overlays, great job!
It looks like something you would pay a lot of money for! I love it.
Stunning! I love the gold edge on the overlay as well as the hardware you chose. Amazing job!
Looks beautiful! You two did a really good job!
I would never believe that's the same piece! Modifying those legs was just brilliant! The overlays mixed with the hardware are so pretty.
Amazingly fabulous! The overlays are soooo gorgeous!
Robin @ http://www.designbyrobinsnest.blogspot.com
It's beautiful! The gold detail on the overlay is stunning.
sarah, that is stunning! love it so much!
You make it look so easy! Your style is just gorgeous I'm in love.
This looks so good!
It's a shame it still looks so commercially. I mean, I saw this exact credenza in my local bank last week. I am obviously lying, and this is obviously gorgeous. Loved seeing the whole thing after all the sneak peeks! Beautiful job, the overlay is really, really gorgeous.
It's seriously awesome! I love the gold detail inside the fretwork, very clever!!
You are mad crafty! And, my idol. Awesome job!
amazing! i love your attention to detail, and i have to say you have the best imagination…because most of us would have just walked right on by that sad credenza, but you made it awesome!
I am trying to zhush up my husband's office and would love to do something this cool but I can't do that much reno on the corporate issued furniture. Grrr.
Gorgeous! Love how you made the overlays yourself!
Wow! That's all I can say! Wow! {breathtaking!}
Wow. You are. Amazing. I love it all! Especially the inset legs and the detail on the front. I would have given up with the jigsaw, I know how hard that is! Great job!
OH. my. goodness. Your talent and eye never cease to amaze me!
Just totally amazing!!!
And the change of the base is so subtle but makes such a huge difference too. I'm in awe of you guys once again!
I cannot get over how friggin' talented you guys are!!! This piece knocks my socks off!
Amazingly gorgeous! I got a jigsaw for Christmas and I'll have to get a different blade. I'm so impressed with your cutout. The crazy thing is I bought almost an identical credenza a couple of weeks ago ($35) and that thing was a beast! Luckily the guys I bought it from loaded it into my minivan, but just getting it out into the garage with my husband was nearly impossible. So heavy. I cut the bottom off mine and threw a counter and sink on top and turned it into a kid kitchen. You get the gorgeous points, (I may paint it and pretty it up down the road, but not now.) I just loved that we used almost the same piece.
That's amazing! You have some patience to tackle that fretwork. 🙂
That is just amazing. I can't believe you cut out that overlay!
Woohoo! I signed up to get your updates just in time! Your attention to detail is evident. It's really dreamy looking now. Nice work!
Sarah, I am in love with it, too! 🙂
I have a picture of a credenza with similar detail somewhere in my "Want!"-folder, and just the other day I saw it again and was thinking about how I could tackle this project (because I must!).
Your credenza is incredibly pretty, Sarah! Thanks for the great tutorial!
Wow, Sarah – This is just crazy beautiful!! The idea to paint the inside of the overlay in gold is such a stunning detail!
holy crap that's awesome 🙂
This is RIDICULOUS. As in, ridiculously gorgeous, and you are ridiculously talented!! I cannot believe the level of detail in the projects you tackle – and you always pull them off! Amazing job!
the credenza is stunning!
Sarah, this is amazing! I am always blown away at how creative and inspiring and unique your DIYs are!
Why chalk paint?
Hi! I used chalk paint since I couldn't paint outside or in a garage. I like using an oil based primer, so I didn't want to get the fumes in the house. Looking forward to spring!!
Is there anything you can't do? You should seriously have your own custom furniture line. Amazing as always and I always admire your dedication and patience through these intricate projects. Way to go!
Just found your blog- love love love! Wondering if you would share what type of gold spray paint you like to use. I've got some serious hardware to start spraying.
Thanks so much Kelly! I used this one: http://www.rustoleum.com/en/product-catalog/consumer-brands/stops-rust/bright-coat-spray – love the color!
I've also used this: http://www.dickblick.com/products/montana-gold-acrylic-professional-spray-paints/ (goldchrome)
seen in this post: http://sarahmdorseydesigns.blogspot.com/2013/10/gold-pharmacist-lamp-my-new-favorite.html
Also nice, just a little warmer
Y'all did such a great job with all of that intricate detailing! It really paid off. Your DIYs always amaze me 🙂
Wow Sarah! You have truly found your calling! Damn good my friend!
so so good! You never cease to amaze me! The gold edge detail is perfect!
Love this. I'm making some changes to my office now and just can't make it work with my current credenza because I need more organized storage space. SUCH a great idea….on the hunt for one today. 😉
Holy moly, you are amazing! I love this, and am feeling so inspired by this, that I may go cut a design of my own out today! Thank you. You are amazing! Have you ever used a scroll saw for fret work? I LOVE my scroll saw ($70ish Harbor Freight). I just wonder how easy it would be to hook and unhook the blade. I might have to give it a try. My fav thing to cut on it is 1/4 mdf. You have got me thinking… thank you! You are amazing.
ABSOLUTELY AMAZING!!!! I love this. And the overlay….beautiful work! The hard work of making that overlay most definitely paid off.
I love this credenza! So creative and I am crazy about your chair too!
I love this transformation! It looks great!
Absolutely gorgeous, Sarah! I am in awe!
This is amazing! I love the gold on the sides.
That is an amazing makeover the overlay wood , I would never had thought to do that. I live in Ohio too!
That is an amazing makeover the overlay wood , I would never had thought to do that. I live in Ohio too!
This is amazing! The inset legs and frame almost give it a mid century vibe. Brilliant! The overlay is so detailed and delicate, beautiful. So inspiring.
That is beautiful! Awesome job on the overlay. I love the yellow lamps, too.