
It felt dark, heavy and unbalanced, but nothing that a little paint and little re configuration couldn’t fix!
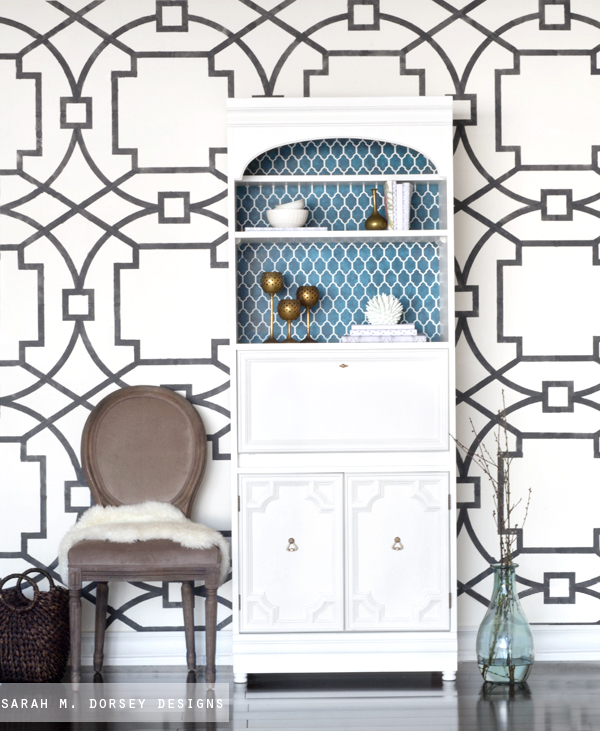
By moving the drop down panel directly above the doors, it felt more balanced since the closed areas were together with the open shelving on top. Plus now it could double as a secretary desk!
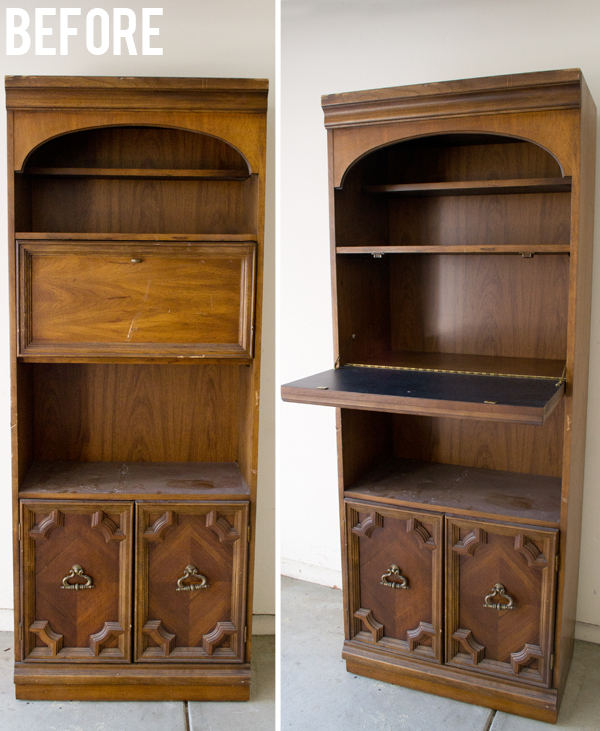
Here’s how we did it:
First we removed the back panel – it was easier to move the shelves, plus stenciling the back outside of the bookshelf is much easier!
To be desk height, the middle shelf needed to be raised about an inch (since we were adding feet, we took into account that measurement too). We added wood, some wood glue and clamped.
Next, we filled in all the damaged areas with wood filler and once dry, the entire piece was sanded with an orbital sander (medium 100 grit sandpaper and then finished with a fine 220 grit sandpaper).

Then, we wiped it with a mircrofiber cloth to remove all of the dust. For paint, my preference is an oil based primer, such as, Zinsser Cover Stain – it leaves a super durable base coat and it prevents the stain from bleeding through light colors. For the top coat I used Sherwin Williams Pro – Classic, a water based enamel like paint that leaves a super hard finish.
I used a smooth 6″ foam roller to apply both (2 coats each, and lightly sanding with a fine grit sandpaper, and wiping the dust off in between coats)
Next, my favorite part, stenciling! It’s one of the easiest ways to take a project from ok to WOW for a budget friendly price.
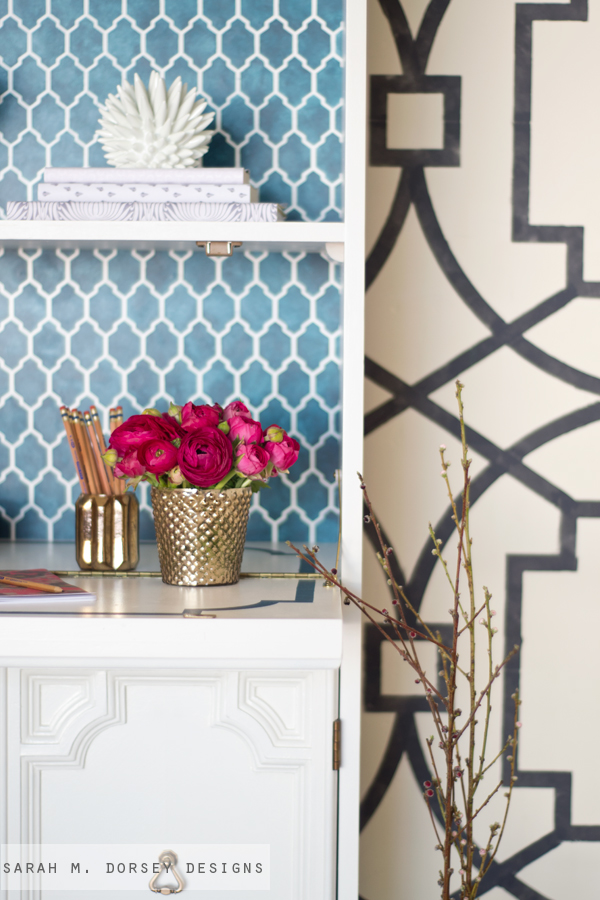
For the wall stencil, we drew the pattern in Adobe Illustrator, cut 9 sheets of thin plastic on our Silhouette Cameo and taped together. I love the large scale!
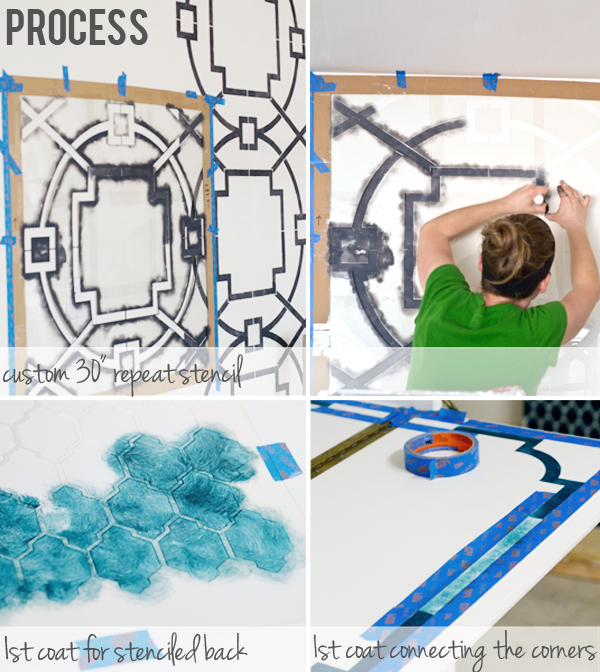
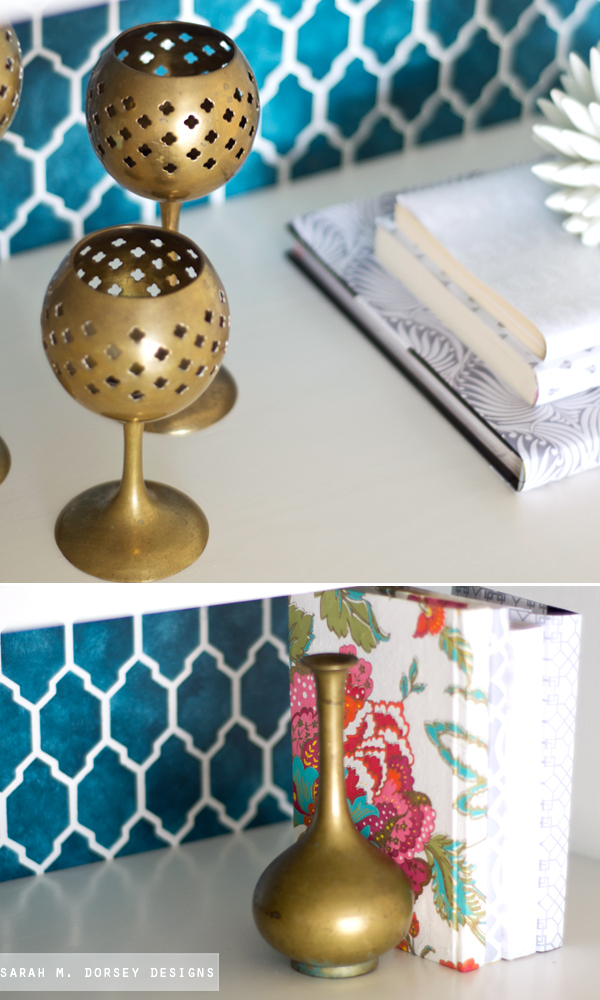
Prior to reattaching the back panel, I stenciled a smaller Moroccan trellis stencil in a deep turquoise. To finish it off, I created a border stencil for the fold out desk.
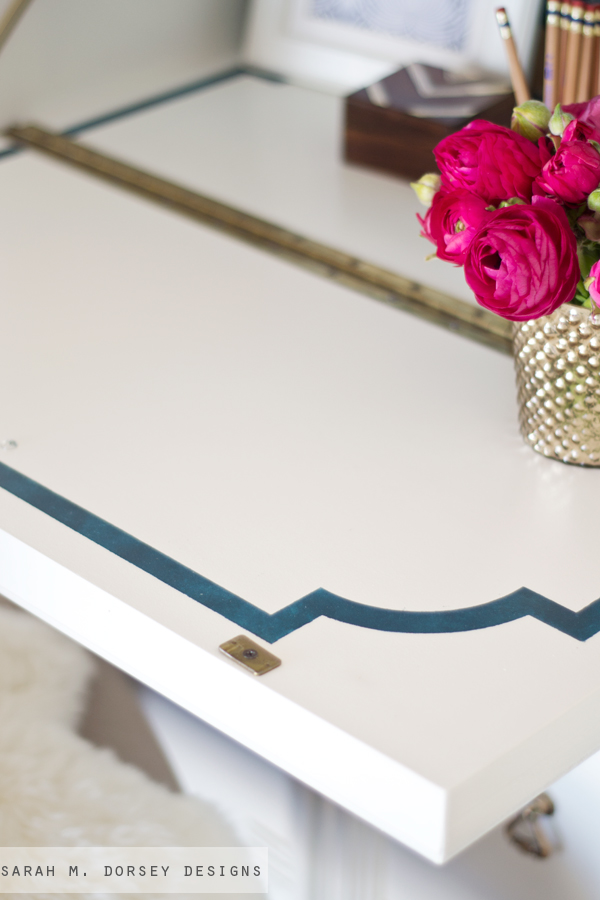
I love the pop of color and pattern that it adds.
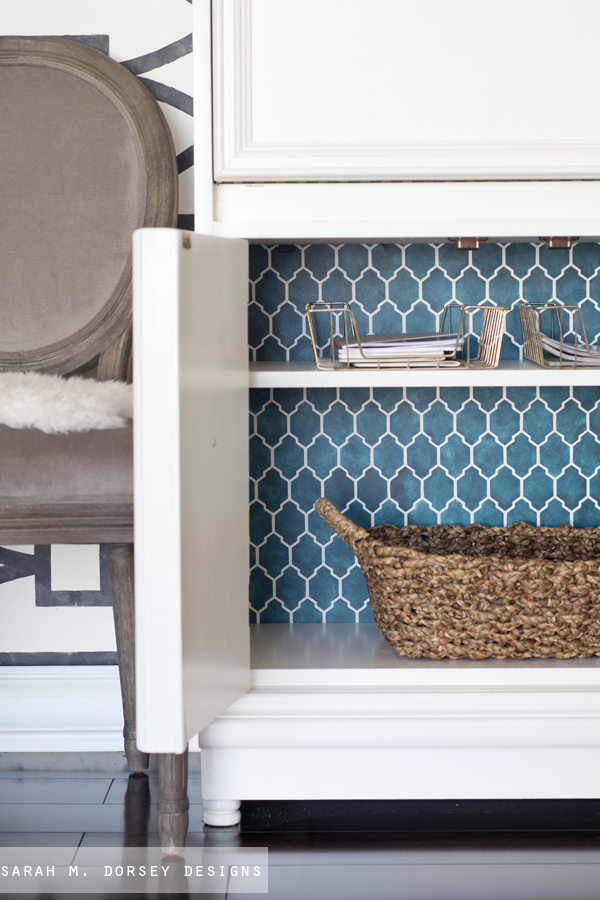
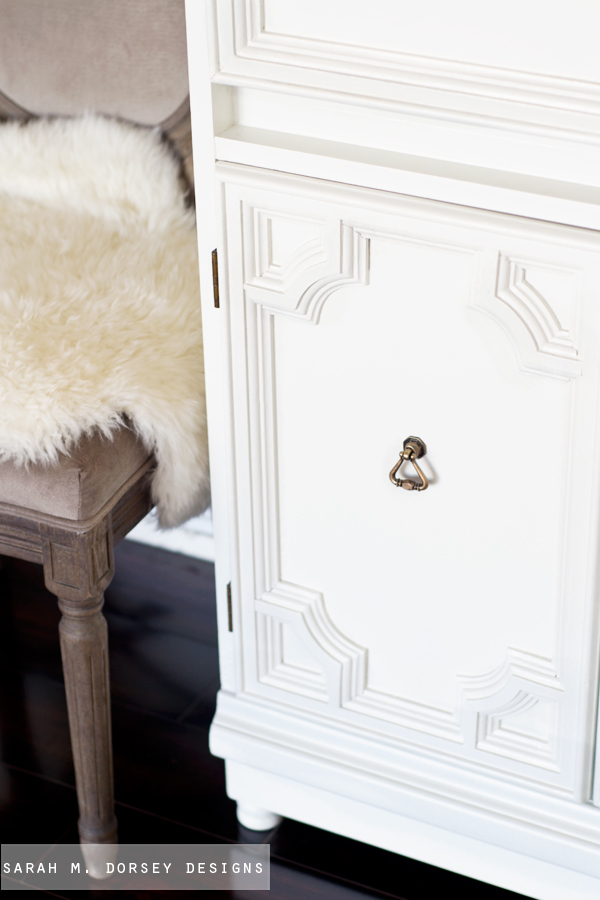
To prevent it from looking bottom heavy, we added small feet (re purposed a section of spindle railing) to give it a little lift.
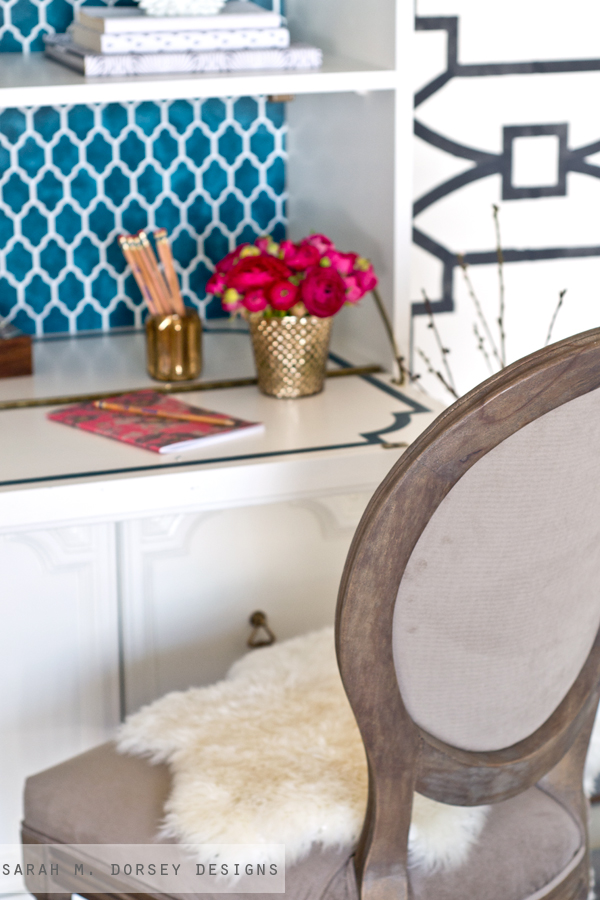
I love how a chair can be pulled up to use the desk, and then neatly tucked away. Perfect for a smaller home!
I picked up a few brass candlesticks and vases from a local thrift store for only a few dollars each.
The pencil cup and vase are votive holders from Target.
I’m always amazed by the power of paint! I LOVE the transformation! I’m so glad that I looked past the worn stain, damaged wood, and awkward door placement – it’s now one of my favorite pieces!
Guessed it again, voted and love it 😉
Thanks so much for voting Julia!! You rock!
Really loved this project! So wait…did you stencil a wall in your garage??
haha, yes! Just enough for the photo. It doesn't look very heavy, but there was no way for us to get it upstairs! and we felt bad asking a friend, because our stairs are pretty narrow and it's a lot of steps! Especially since we have no place to put it … made sense just to keep it in the garage!
Nice job – you're so good with the stencils! Good luck!!!!
Thanks so much Auralee! 🙂
Visiting from your feature on The Chronicles of Home and am your newest follower! That wall stencil is AWESOME!!!!!! I love the large scale of it. You've inspired me to try this on our stairway wall leading up to the second floor.
Hi Lo! Thanks so much for stopping by! 🙂 If you try it, let me know how it goes! I was a bit nervous over the size at first, but then I fell in love with it once I started painting!
Hi there! Popping over from The Chronicle of Home and just had to check out this project! I LOVE that 30" stencil. I was really hoping you had bought it somewhere, I would use it in my powder room in a second!!! Your secretary transformation is fabulous! Your style is adorable and I can't wait to check out more of your projects! I'll be sure to vote for you in the contest! 🙂
Sarah
Hi Sarah, Thanks so much for stopping by! Royal Design Studio has a similar one (it has more curves and is a little smaller), it's called Comtempo Trellis. Check Monday for voting info!! 🙂 Can't wait to share my next project!
Wahoo!! Congratulations!
Thanks Elizabeth! 🙂
Great job, love it. Such a great example of what old and dated Goodwill stuff can become. Your two favorite flowers are mine as well! Is that the Nate Berkus sea urchin I spy? I got the gold one.
Thanks so much Barbara! Yes, I love my nate burkus sea urchin!
ooh yay! don't tell the others but i definitely voted for this one. 🙂
Thanks so much for voting Cassie!
Fantastic! Really love both stencils!
Thanks so much Ashley! 🙂
Great job … is the desk made of real wood (since it's heavy) or is it laminated? I have a piece of night stand (laminated) and not sure how to paint it .. so been reading your site to see if you cover at tutorial on how to paint laminated furniture. Thanks for sharing.
Good question! It is a mix of real wood (the doors) and real wood veneer over MDF, the flip down shelf is laminate (I plan to put a coat of poly on before selling for extra durability).
For the whole piece, I used a liquid deglosser, it didn't rough up the surface enough, so I also used my orbital sander. I filled in the holes with wood filler, sanded. I then primed it (I like sherwin william premium wall and wood) and then painted with sherwin williams pro-classic, with a little xim extender. I love the hard coat that the pro-classic leaves!
I absolutely adore what you did with this piece! I knew instantly that it was your project when I saw it and had to vote for it cause it's just beautiful! If we weren't across the country I would take it off your hands in a heartbeat 🙂
I love your blog by the way…I'm always showing your designs and creations to my friends and looking for more creative ways to spice up my home. Thanks for the inspiration!
~ Char chartrueth.blogspot.com
Hi Char! Thanks so much for voting!! I appreciate it 🙂 and thanks so much for your kind words! sarah
Beautiful Sarah…Pinned
Thanks for pinning Sarah!
Love it, have voted for you every round. Do you have hardwoods in your garage?!
Thanks so much for voting Katy! I meant to bring that up, thanks for reminding me! I added an in process photo that is zoomed out so you can see how we did the floor 🙂 It is laminate over concrete!
Great idea!
Love the "Secretary." If I lived closer to you, I would so buy it from you! What I really need to do is to learn how to do these type of projects. So NOT crafty or creative here!
I love this piece!!!!! How much do you think you are going to sell it for? Erica
This turned out so pretty!! I love all of the brass accents.
Kristina
Kristina does the Internets
Beautiful! Would it be possible to provide mpinstructions/more details on how you created the stencil?
Sorry, I didn't realize that you sold stencils. Will you offer this large scale stencil for sale?
Hi Michael!
I unfortunately can only cut up to 12×12 and it takes too much time to tape together, Royal Design studios has a similar one (smaller and more curvy) called contempo trellis, you may want to check that one out.
Here's how we did it.
We created the design in illustrator and then cut out on our silhouette cameo (to scale and then moved the design over to cut the next section)9 times, then we taped them together and put thin cardboard around the sides for extra support.
Thank you! 🙂 Sarah
Way cool…thank you for the added details. I've seen this pattern as wallpaper and thought I could do as a stencil. I just may give it a try. Thanks again!
Love this idea! What type of paper/cardstock did you use for the stencil? I have a Cricut that I've been dying to try to use as a stencil maker, but I'm afraid I won't use the right medium to help it stand up to the process.
Hi Jodi, I use a a thin clear craft plastic. I don't think that it has specific name (the packaging just says clear craft plastic) Hope this helps! 🙂
Loved, and voted for it. (And was pretty confident that it was yours.) Sure wish we lived next door and I could make you a pie (or cookies?) to bribe you for ideas on my house… 🙂 (I don't mind getting my hands dirty, I'm just short on ideas right now.)
Looking at these projects I totally need to bust out my RDS stencils from our old house!
I'm a new follower (by email, fb, twitter and pinterest) from Creating With The Stars.
xo,
Shannon
AKA Design
Blogger Homes
Hi Shannon, Thanks so much for following along!:) Stencils are my absolute favorite!! Love them!! Sorry for my delayed response! xo sarah
Sarah-
What kind of material do you use to make stencils with your cameo?
Hi Bret, I use a a thin clear craft plastic. I don't think that it has specific name (just clear craft plastic) Hope this helps! 🙂
Thanks didn't know if there was a certain brand you recommended
Absolutely gorgeous! Where did you get your large vase?
It was from Marshalls 🙂
Hi Sarah- I know you said above that you aren't going to be offering the larger wall stencil in your shop, but can I beg you? 😉 Can you print out the sheets for me and then I will tape them together after you mail them? It's just gorgeous. I've been lusting after that fretwork print forEVER 🙂
Hi Reichel! Send me an email a sarah.m.dorsey@gmail dot com and we can talk about a few options that I have in mind 🙂
I love that blue! what is the name of that color?
Hi Christine! I'm not sure..sorry! I'm pretty sure that it's from the Benjamin Moore Affinity line.
Hi Sarah! What color of white is the secretary painted? Did you use SW Pro Classic in semi gloss? Getting ready to paint a dresser to use as a console table, and scared to pick the wrong white! I also want a hard coating, and durable top surface to set lamps, etc on top. Thanks!
Hi Andrea! It's Sherwin Williams Alabaster – it's a great soft, neutral white! Pro-classic, semi gloss. Make sure to use a good primer too, oil based is great .. it's stinky and a pain to clean up though.
It turned out so beautiful! How many hours did you spend working on it from start to finish?
By the way, is that chair from Restoration Hardware?
Thank you! I probably spent 2-3 days (including breaks and paint drying time too) The chair is from World Market!!
I love this secretary transformation. I was curious if you planned from the beginning to add the feet? How did you account for making it desk height between the feet and the wood you added?
Hi Brenda! I did plan on adding feet at the beginning, prior to adjusting the desk height, I took into account the feet height too.
I always love when someone's art degree helps make the world a more beautiful place! Kudos, Sarah!
Sarah, I love both these stencils. I just keep coming back to it. I'm curious as to the color of the large stencil as well as the small print inside the bookcase. Would you mind sharing?
My other question is regarding size….I have a small guest bathroom with only 8' ceilings. What size wall stencil would you suggest for a small room? I couldn't get away with the large size you've so boldly used (sniff sniff) but I'd like to go as big as I can. Any suggestions?
Thank you!!
Im Curious about the color that you painted the large stencil with. In the picture it looks like you are using a marker of some sort. Is that how you usually paint your stencils? And do you sell the image to print our own stencil? Thanks!
Would you sell the stencil you used on the wall???? I really want it! I would even pay to rent it and retuen!