I realized that after Creating with the Stars, I never shared the full tutorials on how we built our grasscloth + nailhead feature wall and our custom upholstered headboard. So today I’ll be sharing how we built this massive feature wall and tomorrow I’ll share the headboard.

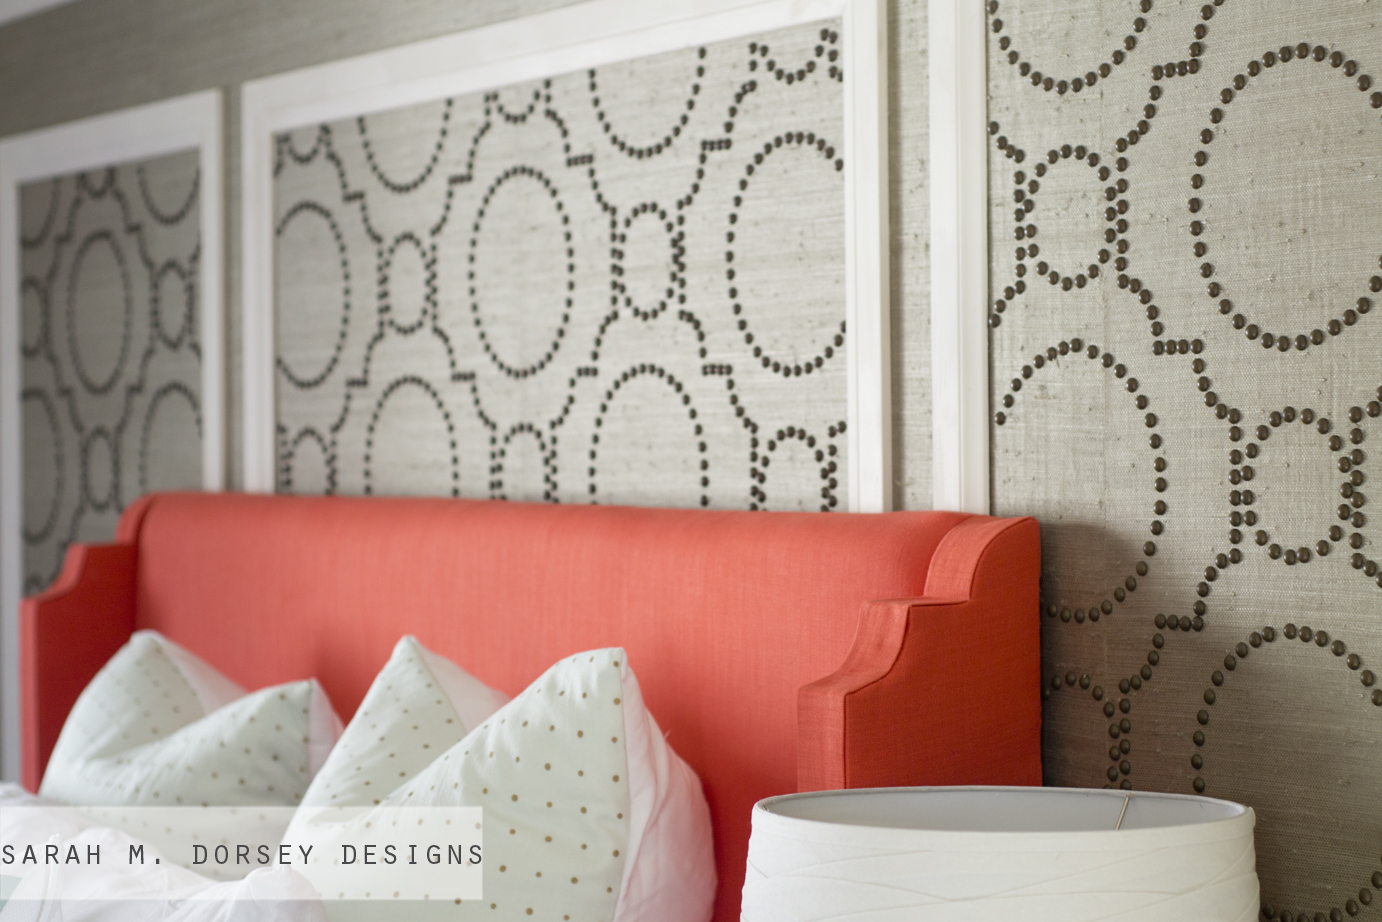
Living in a rental makes it nearly impossible to install classic wallpaper and nailhead, so we decided to build a seperate feature wall!
We wanted to incorporate two of my favorite materials, nailhead and grasscloth wallpaper. I love the texture of the wallpaper and the dimension of the nailhead. So I was determined to find a way to make it work!
Want to know how we built the wall? Here we go!

We purchased three sheets of plywood from Home Depot and had them cut to 7′ high. Since the feature wall is 12′ long, it would need to be built inside of the room. We designed it so that it could easily be dismantled into three pieces to be removed. We tied the seams together with 1x3s and built a frame on the back with 1x3s so it was extra sturdy and straight. We then flipped it over and primed it so that they wall paper adhesive wouldn’t soak in. **side note: it was SUPER tight in the room, we basically had about a foot on all sides to walk around and yes, that is the mattress shoved into the bathroom, it barely fit!)

Once dry, we cut the wallpaper to the correct height, placed it to the side and rolled wallpaper adhesive over the primer. We then used a wallpaper smoothing tool to remove any bubbles. The steps were repeated with 4 rows across, lining up the seams. It was helpful to have two people so that it could be adjusted as needed!

For the design, I was inspired by this fantastic headboard by Annie Selke. We created the design in Illustrator, and calculated the distance between the nailhead and printed it on two sheets of 11×17 which were taped together (You can download our version HERE, print on two sheets of 11×17 – design overlaps so use the extra design to help line it up before taping). We then punched little holes through the dots and used a felt tip pen to lay it out on the wallpaper.
Nailhead isn’t the most fun thing to apply, but once you hit a rhythm you move pretty fast! Here are a few tips that I found helpful as I went. 1. To help protect my fingers from the hammer and to grab the nailhead more easily, I used rubber finger tips on my thumb and index finger (you know the ones that they sell in the office supply stores for sorting paper and such?) When I did hit my fingers, it hurt a lot less, and they weren’t even sore when I was done! 2. If your wood is soft enough, push a few in with your finger first and then hammer. This saves time since you are putting the hammer up and down less frequently. Since our plywood was soft and hard in different spots, this wasn’t always possible, but it helped when we could! 3. Lastly, this feature wall took about 2,000 nails. Wow, that’s a lot of nails! So it was helpful to have two people or if you have the time, break it up over a few days. Total install time for the nailhead with two people was about 8 hrs.
We installed the trim (we painted first) before the nailhead reached the edge, so we knew exactly where to stop it. We used finish nails to secure the trim and then filled the holes with wood filler , sanded and painted once dry.
Next, we decided that we wanted the wall to sit just above the trim, so we cut legs to height out of a 1×12 and secured it to the back frame. We then installed a few cabinet anchors through the trim into the wall to make sure that it was firmly attached.
This wall was pretty massive! Almost the length of the room, but I LOVE the impact that it has on the space! Just because we are renting doesn’t mean that without a little creative thinking we can’t have a statement wall!

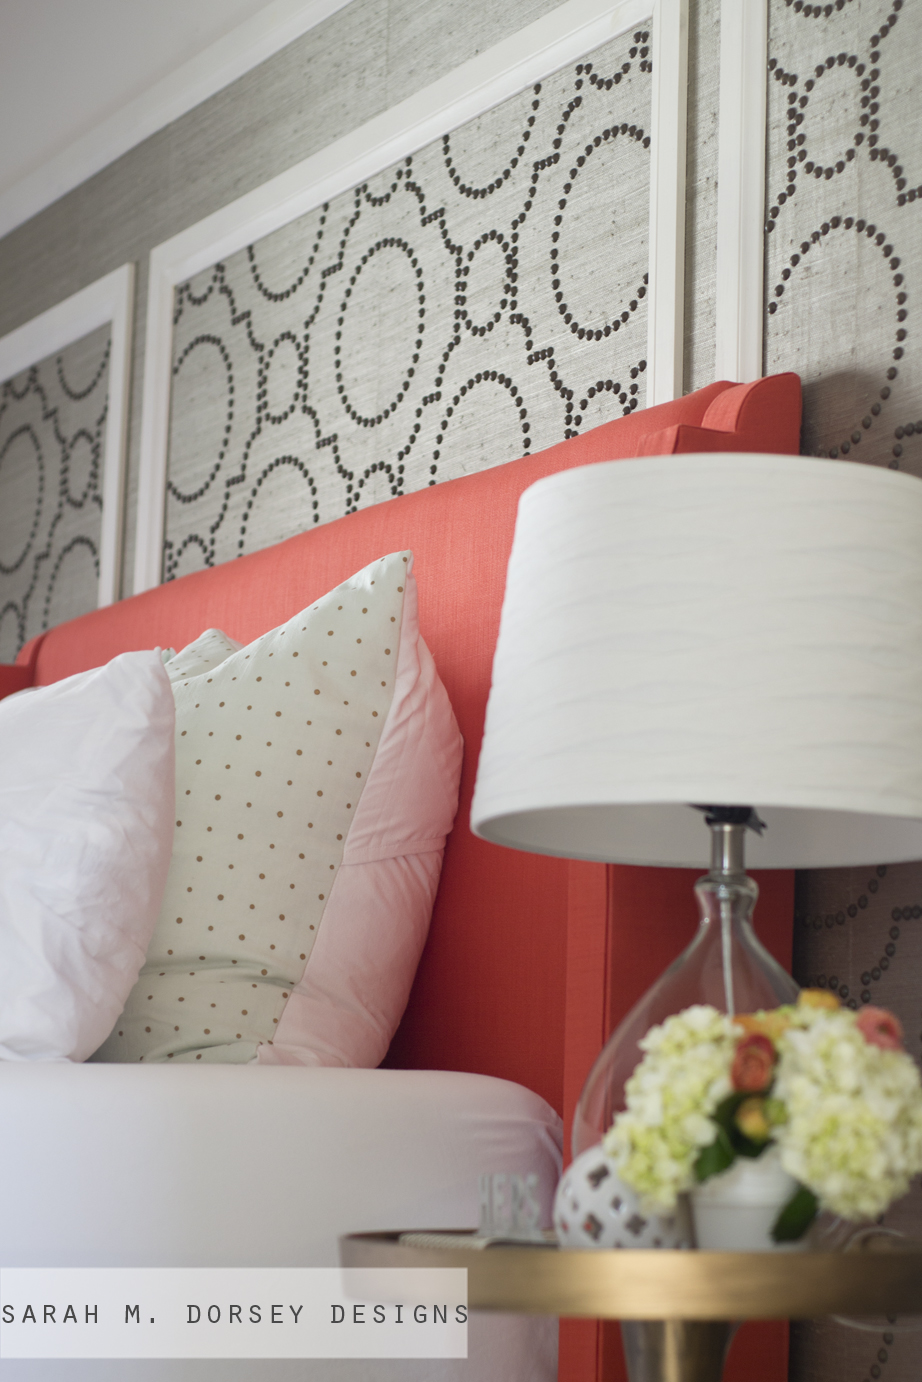
I love how the grasscloth slightly shimmers depending on the lighting.

The nightstand is from World Market, the sphere from TJ Maxx and I picked up little letters (to spell his and hers) from a local antique store, books were wrapped in paper from the Paper Source.

Hydrangeas and Ranunculus are two of my favorite flowers!

This week was sponsored by Home Goods, and if you read my blog, you probably know that I’m pretty obsessed with the Home Goods/TJ Maxx/Marshalls brand! I love the thrill of the hunt, designer names and the affordable prices!
I picked up a cute accent chair, fluffy white rug (my puppy love it too!) and the white sphere!


Finally, here’s where we got everything! (headboard resources tomorrow)
Feature Wall: Grasscloth wallpaper, Nailhead (we used about 2.25 boxes), Trim- I found 2.5″wide synthetic trim from Home Depot on clearance for $4/8ft board
Accessories: Night stand (World Market – not on website), decorative sphere (TJ Maxx), His and Her letters (local antique shop), Throw pillow on chair, chair (TJ Maxx), lamp and lamp shade, duvet cover
Can you please source the bed linens?! Looks awesome!
I'll give links tomorrow with the headboard tutorial, but the euro shams were made out of scarves from world market, the coral floral is a dish towel from world market, the accent pillows are white ikea 20×20 covers with a border painted on them, and the duvet is the organic chevron from west elm 🙂
where is the bed from? it's gorgeous!
Hi Chelle, Thanks! We made it, stop by tomorrow for the tutorial! 🙂
Hi Sarah,
Will you be putting the stencil that you used for this grass cloth wall as a download so I can give this a try? Pretty Please? I too love the design on the Annie Selke headboard, but cant figure out how to recreate it lol. I LOVE your feature wall, would like to try it out in a much smaller version. Thanks!
Hi Jeanna! I just found the file and uploaded it 🙂 It took us a while to get the proportions just right, so I'm glad someone else can use it too! 🙂 It is under the photo of me laying out the pattern. Let me know if you try it! 🙂
Thanks So Much Sarah! I will be trying this for sure I will let you know when I am all finished up maybe share a few pictures, thanks again!
Not going to lie. I am pretty obsessed with this!! xo Kristin
Thanks Kristin!! 🙂 xo sarah
Love. This. Can you provide the number for the wallpaper? The link takes you to a list of wallpapers.
Hi Ashley! It is HGTV Home by Sherwin Williams, Coast Cool Collection, 441-5628. It looks very gray online, but it is actually brown with a neutral gray tint.
This looks awesome Sarah!!
Thanks Laura! 🙂
Ummm yeah, that's pretty amazing. I absolutely love the inspiration headboard and I adore the way you've incorporated that inspiration into your space. I think it's so great how you are turning your rental into a space that's truly reflective of you. Thank you so much for sharing it all with us. And a huge thank you for sharing this template. It's such a fun design!
Thanks Shavonda! That is so sweet!! 🙂
Your design is perfect. What a beautiful room! You have such a great eye for design. What was your inspiration? I have never seen anything like it!
Thanks Janet! I've always loved grasscloth paper and thought that this would be the perfect place to use it and while I was looking around I saw that Annie Selke nailhead headboard and fell in love! Love Pinterest! 🙂
LOL 2,000 nails…I don't think my hubby would help me. It was so worth it and looks beyond amazing, I know I've said it before. But you guys rock!
ha! We probably should have calculated the number of nailhead before we started … we would of definitely done something different!! At least it worked out in the end! Thanks Julia! 🙂
Sarah this is FANTASTIC! What an undertaking, but the end product is so worth it. I rent as well, and this has given me the inspiration to tackle a big project that I could transport to our next home.
Hi! I LOVE this so much and am going to try and make one myself, but I was just wondering if you knew an alternative to Grasscloth? I live in Canada, and all the Grasscloth wallpaper I have seen have been 180$ for a roll and I don't want to spend that much. Any suggestions? Burlap? Or is that too thin? Any help would be very much appreciated! Thanks!
That feature wall is beyond fab. You really deserved to win. Congrats!
hi sarah, how does the headboard stay standing? thanks
The headboard is free standing between the mattress/box spring and the wall. The center plywood goes down to the box spring and the arms help keep it in place. We haven't had an issue with it moving, but for added security you can secure it to the wall with french wall cleats.
Just found your blog and love, love this accent wall. If only I had the patience to do something like this. Awesome job!
Great room makeover! Let's link up, I like your style 🙂
This is AMAZING. If I could I'd fly upon down here to do it for me. I'm starting my own DIM(do it for mr, but be sure it's DIY. Ha look for my new blog!!
Thanks for all your continually inspiring
Hello Sarah.. I love your designs and I'm using this room as my inspiration. Can you tell me where you got the sheet that have the design on them? I know on the picture these are white, however there were some that you had on a previous photo that had designs. Thanks in advance.
Thanks! It's Tahari, purchased at TJ Maxx!
Your bedroom looks so pretty, and the grasscloth added so much elegance – it looks like a room in a luxury hotel!
I have a quick question. I am trying to figure out how did you secure your inspirational wall to the wall? I read were you said you used cabinet anchors, but did you drill them through your border and then put would filler over them?
Hi Gerard – Yep, we drilled through the trim, secured the feature wall with cabinet anchors, filled the holes with wood filler and then painted. We made them 2' in so we knew where they were, making it easy to locate and remove the wall.
Thank you so much. I've decided to do a feature wall in suede and though that this would be a great idea. Thank you so much!!!
nice design – we were inspired by it but used a different take, my girlfirend asked me to help her re-design her daughter's bedroom. Your photo above won the seal of approval. So we decided to use gray paint, and use canvas stretchers as the frames, with a "grassclothy-ish" material. And is was great to be able to download the pattern for the nailheads! We will have before and after shots of the room, if desired we can share those. Cheers